Search This Blog

Friday, August 26, 2011

Ripping your DVDs and Blu Rays pt.2: Extract Subtitles for M4V / MP4 / iTunes

UPDATE March 2014

Handbrake (from version 0.9.9) will now burn subtitles direct from MKV containers ripped from Blu-Rays as the screen shot below shows:


But I've kept this post on, in case you are using an older version of Handbrake.

Also, for the record, BDSuptoSub can be run on OSX - but you need to install the OSX Java engine
------------------------------------------

In a previous post, I covered the method I use to rip DVDs and Blu Rays for use in iTunes and iOS products (check out the article here if you missed it).

To recap the tools I have:

I have been trying for sometime to find a way, using my Mac, of carrying subtitles over from Blu Ray discs onto these ripped M4V files.

(BTW, Windows users, the following software all comes with Windows versions - so you should be fine to follow this summary described below.)

Often films contain "forced subtitles". These are for when a film in English language has dialogue spoken in a another language, and forced subtitles translate just these small sections rather than the whole film.

They are called "forced" because they play back as default on DVD and Blu Ray players. Trouble is getting them to do the same on your ripped copies.

As an example, the Lord Of The Rings trilogy of films have sections spoken  in Elvish for which there are subtitles provided. This has been the catalyst for this investigation, as I really wanted those movies for my iPad.

The method described below also works for full subtitle tracks  - especially useful for me for the Millenium trilogy of films where I like to have the original Swedish soundtrack, and have English subtitles.

Obviously, if you are hard of hearing, this is going to be of great interest too for all your Blu Ray ripping.

DVD

DVD is simple, and can easily be done in Handbrake. As you can see in the example below, this DVD of 101 Dalmatians has subtitle tracks recognised by Handbrake.


All you do is

  • Select the right language
  • Check the "Burned In" box
  • Check the "Forced Only" if you want just forced subtitles, or leave it blank if you want all the dialogue subtitled.
That's it.

Blu Ray

Blu Ray is MUCH harder. This is because the Blu Ray format of subtitles are bitmaps, and as such, as not supported by many editing tools - Handbrake included. To witness The Lord Of The Rings in true HD glory and understand that Elvish dialogue, we are going to need to get some more software:
As an aside, this method may be long-winded, and there could be a simpler way to do it - I'm not perfect! So if there is, let me know! It took a lot of research through various forums....

OK, so we will assume you have a nice MKV file of your Blu Ray with all the audio and subtitle options on it that you need.

MKVTools

(1) Open MKVTools and open your MKV file.

(2) Navigate to the "Edit" Tab and choose the subtitle track you want to export (I know the Elvish to English translation for this Lord Of The Rings rip is Track 2). If you aren't sure, open the MKV is something like VLC Player and fiddle with turning on the different subtitle tracks until you find the one you want, then go back into MKVTools.

(3) Check the "Extract Selected Tracks" box on the right and click "OK". Another window will open and you will see the progress of the file extraction. It will store the subsequent SUP file in the same folder as you MKV file.

BDSupToSub

You will now need a Windows machine, or an emulator on your Mac running the BDSupToSub software.

I have searched high and low for a Mac native equivalent and draw a blank. Again, if you find one, let me know.

(1) Open BDSupToSub and load in your SUP file.

(2) Just leave the Conversion options as they are (the resolution should be 1920x1280 as this is the Blu Ray default).

(3) You will get a nice screen showing you the first subtitle line found. You don't need to do anything with this, just go into File / Save/Export and click OK (changing the language marker if needed).

You will have two files; a SUB file and a IDX file.

MKVToolNix

Back to the Mac environment now, and you need to open up the MKVToolNix tool.

(1) Click the "add" button to add your original MKV file and your new IDX file (make sure the SUB file is in the same folder or it will throw an error).

(2) Scroll down the "Tracks, chapters and tags" box until you see the VobSub entry at the bottom. This is your subtitle track. Check that box and uncheck all the other subtitles.

(3) Name the new MKV "Output filename" and hit the "Start muxing" button and wait patiently....

Handbrake

Now you have your new MKV, open it in Handbrake and check the subtitles tab - you should now see a VOBSUB file that Handbrake understands. 


Set your options and off you go! Your output should look like this:

And there you have it.

Not too complex, just a lot of faffing about with different bits of software.

I'm sure paid for software does this out of the box. Actually, I'm not sure! It might not!

Thursday, August 25, 2011

KeepVid.com Review: Download and Keep YouTube, MP4 and other media

KeepVid.com is a little gem that I need to share. I have tried plenty of freeware programmes in the past for downloading YouTube videos, but KeepVid.com really is the best.

And it is totally FREE!!

It's pretty simple:

(1) Go to keepvid.com


(2) Type in the URL of the video you want to download (or you can search within the same box). It might ask you permission to load the Java application, in which case allow it yo do so.

(3) Choose the format which you want to download it in

(4) Click on it and off you go!

You will need to have Java installed (which you can get via your browser or at java.com) but it's cross-platform (works on Windows, OSX, whatever).

You download a program should you wish to, and thus contribute to the site, and if you use it a lot it might be nice to "give something back" via this route. I personally prefer the web service route, and perhaps the authors will consider putting a donate button on the front page?

They list all the sites they currently in their FAQ and it is pretty comprehensive.

So ditch the freeware, that might well be more malware than anything else, and use this excellent free service.

Friday, August 19, 2011

Neuroshima Hex! iPad and iPhone Game Review

An operation and subsequent lay off from work has meant I have had time to do some things I don't normally get time to do. I have watched a lot of movies that everyone else has seen and I haven't; I have made a serious dent in ripping my DVD collection onto iTunes and I have played games on my iPad.

My son enjoys a good game of Monopoly, so we downloaded and played that for a bit. The same publisher also did Risk, which I have loved since a kid, so a few hours were spent playing that. Then iTunes Genius recommended Neuroshima Hex! and the recovery days have flown by.


So what is it? It's a turn-based board game of the world domination genre set in a post-apocalyptic future world of war machines, mutants and mankind locked in a battle for land and resources. As always with these things, he who survives and destroys his opponents wins the game.

There are six armies to choose (four come with the game, and two are available via an in-game purchase). Each has it's own strengths and weaknesses, and your preferences will be based on how you like to play.

I have to say it is much more complex than the likes of Risk, and the phrase "Read The Manual" is very relevant for this game. I'll try and summarise the basics here.

Each player starts with a HQ that has 20 hit points. The goal of the game is to either destroy your enemy's HQ, or take less damage during the game than them. The game takes place on a hexagonal board, which you can see pictured below:


Each player also starts with 35 "tiles" that are split into several types:

  • HQ - The Headquarters that must be defended whilst you attack your opponents.
  • Board Tile Unit - the armies of your campaign. These attack opponents tiles on the board.
  • Board Tile Modules - give your Unit tiles special abilities, such as increasing attack strength or Initiative (more on this later)
  • Instant Action Tiles - provides an instant hit, such as destroying an enemy tile or allowing you to move one of your own to another hex

Each player gets dealt three tiles, of which he must discard one. Two are then used and either placed on the board (if they are Board Tiles) or used as an Instant Action. Players take it is turn to place or use tiles until one of two things occurs; the board is full or a player uses a Battle Instant Action. The battle stage begins, and this is where Initiatives are used.

Each piece has a number marked on them and this is the turn in which they act - the higher the number the earlier in the battle you act and so you get the jump on your enemies by destroying their pieces before they destroy yours. So using a module to increase your Initiative or decrease your enemies is a good tactic.

Different units have different abilities. They can shoot in multiple directions or multiple times (or both!), or use a net to disable an enemy or have armour to defend against attacks. Generally the more powerful a piece, the lower it's Initiative, and this adds an interesting dynamic to the strategy.

Let Battle Commence!
Up to four players can play in a game (either human or AI), but only on the iOS device - although the publishers are promising Internet play at a future stage. There is integration with Game Center, and there are plenty of trophies to aim for.


The game itself is incredibly addictive. There is a steep learning curve, though, and I advise reading the manual included in the game from start to finish (it doesn't take long), studying the armies catalogue and then plunging in for a two player game against the AI on Easy level.

This tutorial from the publishers will give you a good overview of how it works:


It doesn't matter which army you choose to start with, I found my early successes came with the Outpost, but play a few games and see how you get on.

Some people are recommending playing the puzzle version of the game, Neuroshima Hex Puzzle,  to learn it better, but I haven't played that (saving it for a long plane journey) so I can't say one way of the other. I enjoyed the learning curve, and am still finding new ways to set up units against different enemies.

There is an element of luck, getting the right tiles at the right time, but that doesn't overly affect the gameplay as you may have to battle back from a bad start, which is a challenge in it's own way.

With the addition of Internet play, and new expansion packs promised, this is a bargain for £2.99 considering the board game retails at closer to £40 and you have to work out all the attacks and defenses yourself - which can be pretty complex! The two new armies (£1.49 each) add new dimensions, and are worth a purchase when you have mastered the four provided.

Find out more by visiting the publisher's website: http://www.neuroshimahex.com/


Tuesday, July 5, 2011

BlackBerry PlayBook Review - 1 month in...

I have an iMac, a Sony Vaio laptop, an iPod Classic, an iPhone and an iPad. These are my personal productivity and consumption items for when I'm watching movies, listening to music or, indeed, writing this blog.

But my workplace is wall to wall BlackBerry and as such I have a BlackBerry Bold 9780 as my smartphone and am now road testing a BlackBerry PlayBook on behalf of the company. I've had it a month, so thought it might be a good opportunity to reflect a little on it's performance, particularly compared to the iPad

BlackBerry PlayBook image from RIM
Look & Feel
I'm not going to provide an exhaustive list of stats here, for those who want that kind of stuff and wooshy marketing videos, head over to the BlackBerry website. Suffice to say that it is smaller than an iPad, at around 7", but still feels as heavy as one. You can't hold it in portrait mode at the bottom like you can a Kindle as you start to feel the weight pull and it quickly becomes uncomfortable.

Also, in a major blunder, BlackBerry have made it a tad too big to fit into a suit jacket pocket. When I confronted RIM about this, they shrugged it off, but everyone I have spoken to has agreed it is a major design flaw and reprehensible that no-one at RIM thought of this. Where it could have scored a point over an iPad was having it more accessible and portable, but because of those few millimetres, it has to be carried by hand or in a bag like an iPad.

It feels a solid piece of kit, and is made of good quality materials. The anti-slip covering on the back divides opinions. Some don't think it feels right, whereas others think it gives a good feel. I personally like it, and it feels less prone to spinning around or off a table like an iPad can (and if you don't frequently spin your iPad around, try having small children make a grab for it whilst on the kitchen table and watch that sucker spin!).

Screen & Sound
The screen is fantastic. The demo video bundled with the PlayBook looks almost 3D and the sound from the stereo front speakers in clear and not at all "tinny". Loading up some more realistic test videos taken on an iPhone 4 in 720p and the screen copes admirably. So for watching movies and viewing pictures it's pretty good.

Like the iPad, the screen is highly reflective - possibly even more so than the Apple device. The finger prints are a real issue too, and the table requires frequent wiping. Perhaps it's the smaller screen estate, but it feels like it gets dirtier quicker than the iPad.

What is not as good by a long way is the touch sensitivity. Ladies with long finger nails beware - you have to give it a really good jab as the minimised contact area due to those lovely nails often renders the PlayBook immobile. Even for stubby fingered individuals, the screen can be unresponsive requiring a good push and big sweep. Apple really do do this well, and RIM have not got this quite in the same league.

Switching between portrait and landscape is a lesson in patience. The quickest it moves is about 2-3 seconds. Sometime it doesn't change at all. Sometimes it flips upside down randomly. Sometimes half the screen is black, the other half rotated. It's all odd, and all very buggy and very frustrating...

Even RIM can't get the damn thing to rotate into portrait!


Apps
Unlike the hundreds of thousands of apps on the iTunes store, there are only a few thousand if that on the PlayBook. New apps are emerging all the time, but the bundled apps are few and there isn't much choice beyond them.

You get icons for Twitter, Gmail and Yahoo but these are just weblinks that launch the browser. A new Facebook app has just appeared, and that is quite good, but these almost essential apps missing is poor.

The bundled games of Tetris and Need For Speed are good, and will keep the kids amused for a while.

The Documents To Go suite is included, but unfortunately, is virtually unusable. I've used alpha software that is less buggy. It frequently crashes necessitating a hard reset, doesn't save documents and is generally a nightmare. When it's going, it has some nice features and is probably a richer interface than Pages on the iPad. But Pages is a nicer user experience, and hasn't crashed on me once!

The Adobe Reader app is OK. It is an equivalent of Preview on OSX or the preview app on iOS, in that it is not functionally very rich. It doesn't keep zoom levels when you turn pages in the document, the magnification goes grainy quickly and you can't share via email through the user interface. Again, take your pick of better apps on iTunes (I'm a Good Reader fan), but a quick scan on BlackBerry World revealed very little 3rd party options.

The mutli-tasking aspect is good, and I like being able to spin through small screens of the apps that are running. They aren't just screenshots either, movies continue to play whilst "minimised" in this app "ribbon". RIM make a big deal of this, but honestly, who would want a movie to be still playing whilst you are doing something else?! It can be difficult to swipe across and land on the app you are looking to maximise. I keep missing, requiring tiny little prods to go backwards or forwards slightly. Again, the gesture interface is behind the iOS devices here.

Interface for navigating through apps in nice, but it can be tricky to hit the right one


Browser - and the much hailed Flash Support
The advertising from RIM has accentuated the fact that the browser can support Flash. I find the lack of flash on iOS cause me very little inconvenience. There aren't really any of the 10 or so sites I go to 80% of the time (Amazon, eBay, BBC, The Register, Wikipedia...) that don't work on iOS. It's only if I go off the beaten track, to a hotel website or something, where I occasionally come across Flash.

So I booted up the browser in PlayBook and tried a few sites. The curse of the PlayBook bugs struck again, and my Dad's art website that has Flash all over it sometimes rendered and sometimes didn't. Other sites I found to have similar issues. So yes it does support Flash, but the bugs in the browser mean you get to know the hard reset command real quick!

What is nice if that if you are connected through the BlackBerry Bridge and are surfing the Internet on a train where the mobile signal can fade in and out, the browser pauses downloading pages and waits for the signal to reconnect before carrying on. Apple take note - no annoying messages about signal availability and then a blank browser! This is really neat and makes commuting and surfing a pleasure.

HARD REST - Hold down Vol Up, Vol Down and Power!!!

BlackBerry Bridge
Is it a consumer device, is it a business device. RIM tell me it's both. This is a mistake, they should target one or the other. The business techies don't like the fact you can't encrypt the flash drive (you can in iOS using enterprise tooling), don't like the fact it only has HDMI out (I know of no company whose presentation suites accept an HDMI connection) or the fact you can download any number of apps and they can do nothing about it.

Equally consumers will not be happy that the email application is only available when tied to a BlackBerry Smartphone. It's a bit of a faff, but you have to install BlackBerry Bridge on your BlackBerry phone, then turn on Bluetooth, then setup the PlayBook to talk to your phone.

I got it working after a few goes (again, bugs!) but it is not exactly stable. The longest I had it going was half an hour before the screen froze. In a meeting recently, I went to check my calendar and after two reboots and a bit fo swearing, apologised and opened it on my BlackBerry phone.

The Bridge PlayBook apps don't add much over the phone apps. Sure, they use the screen estate better, so Calendar opens in a week view, but there is no improvement in things like checking availability for booking meetings.

The icons are baffling at the bottom - they seemed to be designed so the user has to guess at what they do. I ended up randomly clicking a few to find out what they did in the end!

CONCLUSION
It's quite a nice device, but the bugs make it unusable. It is, at best, a beta product and I do not use it for business at present, because it is so unreliable. RIM have rushed out a product to market to compete with Apple, and risk losing their potential customers before they have even got going.

I have demo'd the device to about 10 senior managers in my company. All 10 of them preferred the Apple iPad. I'm sure this isn't scientific, but nonetheless I think RIM have got this really wrong.

BTW, my company is just starting to allow iOS devices onto the corporate network.

The beginning of the end for RIM???

Wednesday, June 15, 2011

Slow Login Time On Your Mac? Ditch the Cache!

In my previous post, I described a problem with iMovie. As part of the resolution, I trashed the Cache folder. I was amazed at how much faster the Mac logged in. Previously, it had taken up to 10 seconds or so to be useful from the Login screen - with the spinning colour wheel of doom furiously spinning away...

Well no more!

In speaking to Apple Support, the guy on the phone said he regularly trashes the Cache as all sorts of flotsam and jetsam builds up in it. Ironic when it is supposed to help speed things up!

After deleting mine the desktop arrived and was useful in about a second!

Much more acceptable for a latest generation iMac!!

My advice - if things are running a little slow - trash the Cache and see if it makes a difference...

"Connection Failed" in iLife apps (iMovie, iPhoto, iDVD)

This is a doozy. I migrated from my old Mac Mini using the Migration tool Apple provide with OSX and my Time Machine backup. All went well.

However, upon opening iMovie I got hit with this error message:

Connection Failed. The server "<server name>" may not exits or it is unavailable at this time. Check the server name or IP address, check your network connection, and then try again.


And so I click OK. Then the message pops back. So I click OK. Then the message pops back. So I click OK. Then the message pops back. Repeat several more times before figuring out this message ain't going anywhere...

It happens in iPhoto and iDVD too.

The "server" is my old PC I had used to migrate the rest of my videos and pictures from before ditching it, and it seems that encounter has stayed in the Apple config somewhere.

I had a surf round the Internet forums and came across this post on the Apple Forums. It is an older post, so perhaps geared towards iLife 09, whereas I'm using iLife 11. Anyway, it says to go into the Preferences folder on a different user that doesn't have the connection issues and copy over the "iapps" and "internetconfig" into your own Preferences folder. Or something. I'm not sure I followed it, because I can't copy and paste into the Preferences folder (P.S. turns out you can, I was just being an idiot and panicking!).

But I did find a workaround...

SOLUTION 1: Delete the iapps and internetconfig Preferences file and then open iMovie.


This works great the first time. However, the next time your problem comes back - so for me - not a permanent solution, although may work for others.

Finally, I decided to speak to a human being - so called Apple Support. Poor old Rob from Apple was totally bemused by my problem, and he soon escalated it to a "senior engineer" called Santos. Nice chap. We went through the problem and first off he decided we should trash, or move out into a temporary folder, some of the files associated with iMove. Here's what we went for:

iMovie - copy to a new folder
Preferences - copy to a new folder, then trash (some won't delete because they are in use)
Cache - trash
Application Support/iMovie - copy to a new folder

I then logged out and logged back in. I was told not to panic, as my desktop had returned to it's "virgin" state after as the Preferences files that controlled those things had gone (I never did get my Dock back, so just spent 5 minutes putting it back the way I like it). Opened iMovie - worked! No message. Opened iPhoto - and there was no library of photos. Poo! I could rebuild this, but knew it would take time.

Solution 2: Trash all the above files to return to a virgin system state


This is great if it would take a couple of minutes to rebuild iPhoto, or anything else in your iLife apps.

Not the case for me.

Santos then suggested I try putting back the Preferences files a few at a time. After that, he left me to it.

I moved back all the Preferences files accept those that mentioned iLife or any iLife app and logged out and back in.

No error message. No iPhoto library.

I was then left with a few files, and after a while narrowed it down to the two iPhoto Preferences files. No matter what I did, if I put one of them back, the network error message returned.

A dilemma: rebuild iPhoto's library (yuck) or think of another plan.

I decided to see how deep the rabbit hole went, so to speak. Santos mentioned that each network error message was likely to be associated with one file being corrupt or missing. If I kept clicking "OK" and count the number of times I did it, I would know how many files were associated with the old PC....

38

During this time, I also noticed that just moving the message to the very corner of the screen resulted in being able to use all the iLife programs as normal. So a rather tacky solution could be:

Solution 3: Just move the message off the screen until you can barely see it and carry on as normal

But with only 38 files to find, I thought I would give it a go. To cut a half hour story short, I found a bunch of photos I had converted from PowerPoint slides, and must have been left on my PC. When I tried to open one, my lovely network error message came back, but just once. So I moved all those to the trash (but they don't appear in the trash, they are just dead references) and hey presto - FIXED!!

Solution 4: Count the number of clicks, then find all the dead references in iPhoto


CONCLUSION
I thought that after 10-20 clicks of the message it was going to appear forever, and this was a reasonable assumption. But it will only appear for each corrupt or missing file from the network. If there are only a few, try and locate them in your iPhoto library. If there are a lot, might be best to remove the iPhoto Preferences files and rebuild your library from scratch...


UPDATE
I wish I had seen this post in the Apple Forums - I have no idea how I missed it: https://discussions.apple.com/message/12965326#12965326. It describes what I did, but more suited to a larger library. Further down there is a post advocating using a tool called "iPhoto Library Manager" which may be useful if you have a larger library... Previous messages in the post also delete the iApps Preference file and then have the problem come back - so it seems to be others experiencing that and not just me!

Thursday, May 26, 2011

HD-SD Tag: Having HD and SD movies in iTunes

When ripping movies, it can be a compromise about whether to go for a suitable file size and resolution for your iPhone or iPad versus being able to watch something in reasonable quality on your Mac or Apple TV box.

Well, now you can have your cake and eat it! If you download an HD movie in iTunes, it also comes with a SD version for your portable device. Well, when you rip your own, you can set them up in iTunes to mirror that functionality! Cool eh! Here's how:

BTW - big shout out to XeonSSX and his tutorial video on YouTube as well as trockenshaf who contributed a useful comment on that posting. This article is based on those ideas

To start, you will need;
You will also need two copies of your movie of TV programme, one in a suitable HD format and one in the SD format you want for your portable device (my previous article has some help in getting to that stage).

(1) Open Subler. From the File > Open menu choose the two versions of the movie or TV program and open them up. In each version go to File / Import / Search Metadata Online... and find the movie information you are after

You will now have two Subler windows looking something like this:


(3) Set the windows side by side so you can see them both.

(4) In the HD window, select the menu icon from the bottom left hand corner of the screen
Then choose the "contentID" category
Once the contentID is displayed in Subler's main window, type in the number "287750828" (without the quote marks).

<UPDATE 17/02/2014 - with the metadata coming from iTunes, it should automatically set the ContentID. If not, then you can follow the procedure above and choose a random 8 digit number to assign it.>

(5) Repeat this process in the SD window.

(6) Go back to the HD window, and open "Other Settings". Make sure you set the "Media Kind" correctly and tick the "HD Video" box

(7) Repeat in the SD window, but don't tick the "HD Video" box

<UPDATE 17/02/2014 - the new version of Subler is a drop down box with either 720p or 1080p - but it's the same principle. Just set it to the correct HD setting, rather than ticking a box.>

(8) Save the changes File > Save

(9) Locate the files in Finder and drag them into your iTunes window (I like to have the view set in the section I am adding the files to so I can see what's going on)

<UPDATE 17/02/2014 - step (9) doesn't always work. You randomly get either the HD or SD version, but not both. This seems to be an iTunes 11 issue. Here's how to get round it:

(a) Copy the SD version over to iTunes (using the Import menu or dragging and dropping).
(b) Once this has copied over hold down the Alt / Option key and drag over the HD version. After a few seconds, the SD-HD icon will appear
(c) Right-click the movie and click on 'Consolidate files...'. This will then copy over the HD version of the movie into your iTunes folder.

Don't ask why this happens and why this fix works, all I know is it does!.>


(10) The files will be copied to iTunes and you will see the HD-SD tag displayed


<UPDATE 17/02/2014 - in iTunes 11 you can't see the HD-SD tag unless you look at the List view. This is super-annoying, but another 'improvement' Apple have made!

>

The HD copy will play on your Mac and Apple TV, the SD on your portable device!

I'm afraid I don't know any alternatives to Subler for Windows and Linux users. The important thing is to find software that alters that "contentID" tag.

If anyone finds something suitable, please let me know!

Saturday, May 21, 2011

Ripping your DVDs and Blu Rays for your Apple Mac / iPod / iPhone / iPad etc

This article describes ripping your DVDs and Blu Rays using Mac OSX for viewing on your Mac as well as your favourite Apple mobile devices.

Firstly, you should check that whatever country you are in allows you to rip copies of your DVDs and Blu Rays for personal use. I don't advocate piracy or any other illegal activity. But I do think that it is useful to be able to watch films and programs that you have bought on one media on another - and Apple's mobile products are perfect for this.

Sermon over!

To start, you will need:
I am using all the latest versions of these software packages as of the date of this posting.

My iMac is a mid-2011 27" 2.7GHz Quad-core. If you Mac has a faster processor, times will be faster and vice versa for slower machines

Let's set up HandBrake

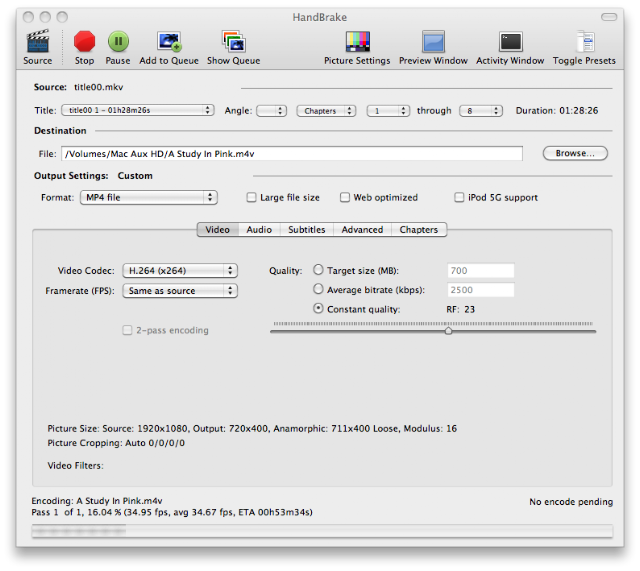
Screenshot of HandBrake for Mac OSX converting a MKV to MP4 (see later section on Blu Ray)
HandBrake allows many, many advanced options for converting media from one format to another. After much experimentation, I settled on modifying the default "Classic" setting to RF: 23. This is a good compromise between file size and quality. I found the file acceptable to watch on my 27" iMac, my iPhone and iPad. I mixed the audio down to stereo 128kbps and removed the chapter markings. Everything else stayed the same.

What the above setting doesn't give is a consistent video bit rate and therefore file size. It's weird that the same TV show on the same disc will give you very varied bit rates. I think it may be to do with the scanning process before conversion, but am not too sure. If you want a more consistent result go for the "Average Bit Rate" option. I set mine to be 900kbps, checked the "2-pass encoding" flag, then checked the "Turbo 1st pass" flag. The software will then do a quick blast through the media file, then encode it based on that first pass information. It should even up the file size and file quality, but takes longer obviously as it is doing two passes:

BOTTOM LINE: If speed is of the essence and you don't care about variable quality too much, go for the RF setting. If you want more consistency between files, go for the Average Bit Rate.

These settings I recommend plays on all devices, so is good if you want to watch on different computers and mobile devices. Of course, feel free to play with the settings yourself or try the other presets for your own particular devices.

If you select the "iPhone" setting, then the Picture size is too small to scale well to the iMac screen.

The "iPhone 4" setting won't play on the iPhone 3GS.

We are now ready to begin.

Let's start with DVDs

(1) Insert your DVD into the Superdrive

(2) Cancel iDVD if it opens automatically by hitting <esc> key and then closing it

(3) Open HandBrake and click the Source button.


(4) Select the DVD inserted and click "Open"

HandBrake will now go away and scan the DVD. This can take quite a while depending on the complexity of the encoding and the number of titles on the DVD (one X Files disc I had that was full of extras took 40 minutes, but most took about 15-20 mins). If it is loaded with extras, prepare to be patient (or go away and come back again!). Doctor Who Series One only took 5 minutes per disc...

(5) Once the titles have all been scanned, they will be listed in the drop down box. The largest one will be highlighted by default.

If you have loaded a movie, then it will be this title. If it's a TV series, this may be all the episodes on one title, so go hunting though the titles to see if each episode is available individually. You can tell the episodes by their run times and the number of each. For example, a X-Files episode runs for about 43mins and there are four on a disc, so those titles will be the individual episodes.

Sometimes, there may be more titles of the same sort of length that the number of episodes on the DVD. My advice is to rip them all and examine them later. One might have extra scenes in for a particular episode, or it could be a long documentary.

(6) Choose your title from the drop down.

(7) Choose a destination. I have a dedicated folder so I can get to them easily.

(8) Click "Start". If you have more than one title you want to rip, repeat steps (6) and (7) and then select "Add to Queue".

And off HandBrake will go. Again, depending on your system speed and the complexity it could take a while. Each episode on The X Files took about 10-15 minutes on average.

Once HandBrake has finished, open MetaX

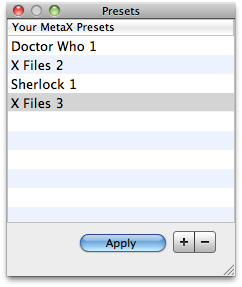
MetaX reduces the manual typing by using tagChimp Open Source DB to look for tags for your movies and TV Shows

It will ask you if it is a TV Show, Movie or Music Video. Make sure you choose the right one, as this affects how iTunes files the media.

(1) Using the "+" button, add your file(s) to the queue, then highlight the first file.

Using the filename, MetaX will go off and search for Meta data about the file and depending on the popularity none, one or many results will return. If none are returned, tough luck! It's a lot of typing. If you do get results, click through them and view their metadata to see if it matches your file and choose the one you like the look of the most.

(2) Chances are you won't get a precise match, so type over any fields you want to change.

If you are ripping a TV Servies will want to have certain attributes like "Show", "Album Artist" and "Rating" the same for all the programs in that series. MetaX has a handy feature called "Presets". 


Simply highlight all the attributes you want  to be consistent, hit the "Presets" button, then "+" and choose a name for them (such as "X Files Season 2").

You will want fields like the Descriptions and Episode Numbers to change for each episode, so don't select them for your Preset.

Finally, hit the "Toggle" button to check all the boxes. If you want to keep the title you originally gave the file in HandBrake, uncheck the Title box. You probably aren't bothered about chapters too, so uncheck that.

(3) Once you are happy, move on to the next title if you have one in your list. Again, find the best fit, then highlight your preset and hit "Apply" in your Presets if you created one.

(4) Once you have finished you are ready to move them to iTunes. MetaX can do this for you. Go into "Preferences" and go to "iTunes / "Send to iTunes after writing".

(5) Then hit the "Write" button. The software will update the tags then move the file into iTunes.

Some "Gotchas"

GOTCHA 1:
iTunes is a bit funny about Movies and TV Shows. If you rebrand a Movie to a TV Show, it does indeed move it to the TV Show folder. But for those that use Front Row on OSX you will find your TV show is still a movie.

There seems to be two tags for TV Show - one for filing in iTunes and one that other programs, like Front Row, use. MetaX does them both, so use MetaX to write this tag and it will sort it for you.

GOTCHA 2:
iTunes files TV shows using Track Number in some places, Episode in others and Episode ID in others. I don't get it myself, but I've had funny things happen if these aren't the same. So I simply always set these to be "1" or "2" or whatever.

BLU RAYS

Whilst Apple don't support Blu Ray per se, you can connect up an external Blu Ray drive via USB and convert them to iTunes formats. A few things to note that are different to DVD.

You thought DVDs took a while to be scanned by HandBrake? It takes FOREVER with a Blu Ray. You will have time for several cups of tea and the Complete Works of Shakespeare.

Another option would be to use MakeMKV (www.makemkv.com/) to copy the Blu Ray in MKV format and then use HandBrake to put into an MP4 format (or whatever you prefer). 

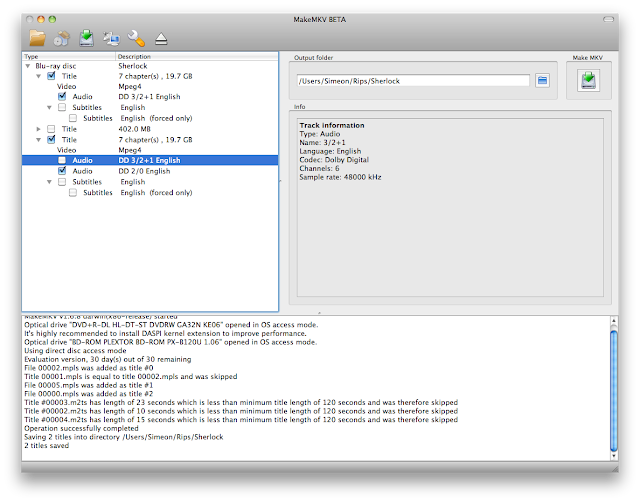
Super fast Blu Ray ripping to MKV, but only free for 30 days

MakeMKV is free for 30 days, then about $60US afterwards. So it's up to you whether you think that is worth it. Scanning doesn't take long at all, and the 1st Disc of "Sherlock" took 30 seconds to scan and about 55 minutes to convert two titles (shows) to MKV (my external Plextor BD-ROM has a 4x read speed). HandBrake was still scanning title 1 after an hour...

If you use MakeMKV, make sure you only select the options you want. Do you want subtitles? Dolby Digital surround sound? You might just go for the Stereo mix and forget everything else, especially if you are ripping purely for portable devices. This reduces file size and processing time.

Once you have ripped the MKV, open them in HandBrake and off you go. I would advise creating another preset, this time based on "Universal" so that the 1920 x 1280 resolution is reduced to a more manageable 720x400 (better than DVD quality still). I called this one "iTunes Blu Ray". No reason why this couldn't be used for DVDs too, again, choices choices :-). I did up the RF to 20 on this setting for the Blu Rays. The files sizes were perfectly manageable at around 550MB for 1h30m programs - about double that of the X-Files episodes (which are about 45mins, so that worked well for me).

The MKV in HandBrake took about an 1h15m to convert a 1h:30m episode of "Sherlock".

The Blu Ray rips are definitely of a better quality than the DVD. OK, I haven't ripped a modern DVD - the X Files was made in the 90s and Doctor Who early 2000s, but still, if I have it on Blu Ray I will prefer to use that, despite the extra time it takes.

If you want to keep a high def copy, use your "iTunes" setting to preserve the 1920 x 1280 resolution (although if you have surround sound, you might want to add that in). It will take about 2-6 hours to boil down to MP4 but the resulting space saving versus the MKV is worth it.

RANDOM TIPS...

Tip 1 - Don't use TrueHD as your audio track source in Handbrake if you want a surround sound audio track in your MP4. I have found it to be unreliable in encoding into AC3 (Dolby Digital) 5:1 because for some reason it sometimes just puts it into stereo, despite selecting AC3 6 speaker in Handbrake.

Use the AC3 track from the MKV file instead - so make sure you include the DD Audio track in MakeMKV when you rip your Blu Ray.

Tip 2 - Run the conversions overnight, as they take a lot of time - especially with Blu Ray MKV to MP4 in Handbrake. You want your processor(s) to have nothing else going on so they can use all the juice to do the conversion.

FINAL THOUGHTS

All the software described here has loads more features than I have listed, but this is just a basic guide to getting your started.

This stuff will probably work the same on Windows and Linux as well, but I haven't tried it, so feel free to find those OS versions of this software and give it a go!

Play around with the software, find your own settings, and if you have any great ideas - post them in the comments fields.

As software moves on, I'll try and keep this updated....